
If you paint with acrylics, you’ve probably stood at the sink wondering whether it’s really okay to rinse your brushes and pour that cloudy water down the drain. The short answer is no — and learning how to dispose of acrylic paint water properly protects your plumbing, your local water system, and the wildlife downstream. This guide walks through exactly why paint water is a problem, six practical disposal methods ranked by cost and effort, step-by-step instructions for the most popular approach, and answers to the questions artists ask most often.
- Why You Shouldn’t Pour Acrylic Paint Water Down the Drain
- Is Acrylic Paint Water Actually Hazardous Waste?
- 6 Methods for Disposing of Acrylic Paint Water
- Method 1: The Settle-and-Evaporate Method (Best for Most Home Artists)
- Method 2: Drain Screen and Dilution
- Method 3: Coffee Filter Straining
- Method 4: Clumping Cat Litter Absorption
- Method 5: Commercial Filtration Kits
- Method 6: DIY Sand-and-Gravel Filter Pit
- Reducing Paint Water Waste in the First Place
- Special Cases: Studios and Classrooms
- Frequently Asked Questions
- Final Thoughts
- Related Articles
Why You Shouldn’t Pour Acrylic Paint Water Down the Drain
Acrylic paint is essentially pigment suspended in a plastic (acrylic polymer) binder. When you rinse a brush, that plastic binder and pigment don’t disappear — they disperse into the water as microscopic particles. Pouring that water down a household drain sends those microplastics straight into the municipal wastewater system, and most treatment plants aren’t equipped to filter particles that fine. From there, they can end up in rivers, lakes, and eventually the ocean.
There’s also a more immediate, practical problem: acrylic paint hardens as it dries. Even small amounts poured down a sink repeatedly can build up inside pipes over months or years, leading to clogs and costly plumbing repairs. If your home uses a septic system rather than municipal sewage, the risk is even greater, since acrylic residue can disrupt the bacterial balance a septic tank depends on to function.
In short, “just a little water” adds up. A single artist rinsing brushes daily can send thousands of gallons of plastic-laden water into the drain over a painting career.
Is Acrylic Paint Water Actually Hazardous Waste?
This depends on what’s in your paint. Most student and artist-grade acrylics sold in the U.S. carry an AP (Approved Product) non-toxic seal from ACMI (the Art and Creative Materials Institute) or comply with ASTM D-4236, meaning they don’t contain enough heavy metals to be classified as hazardous. Paint water from these products is generally safe to filter and dispose of using the household methods below.
However, some professional-grade pigments — particularly certain cadmiums, cobalts, and chromiums — do contain trace heavy metals and are labeled with a health warning (often a CL, Caution Label) rather than the AP seal. If you use these pigments regularly, treat your rinse water as household hazardous waste and take it to a local hazardous waste collection facility rather than pouring it down the drain, even after filtering. You can locate the nearest facility through your city or county’s public works website, or by using a tool like Earth911’s recycling locator.
6 Methods for Disposing of Acrylic Paint Water
Here’s a side-by-side look at your options, from simplest to most involved.
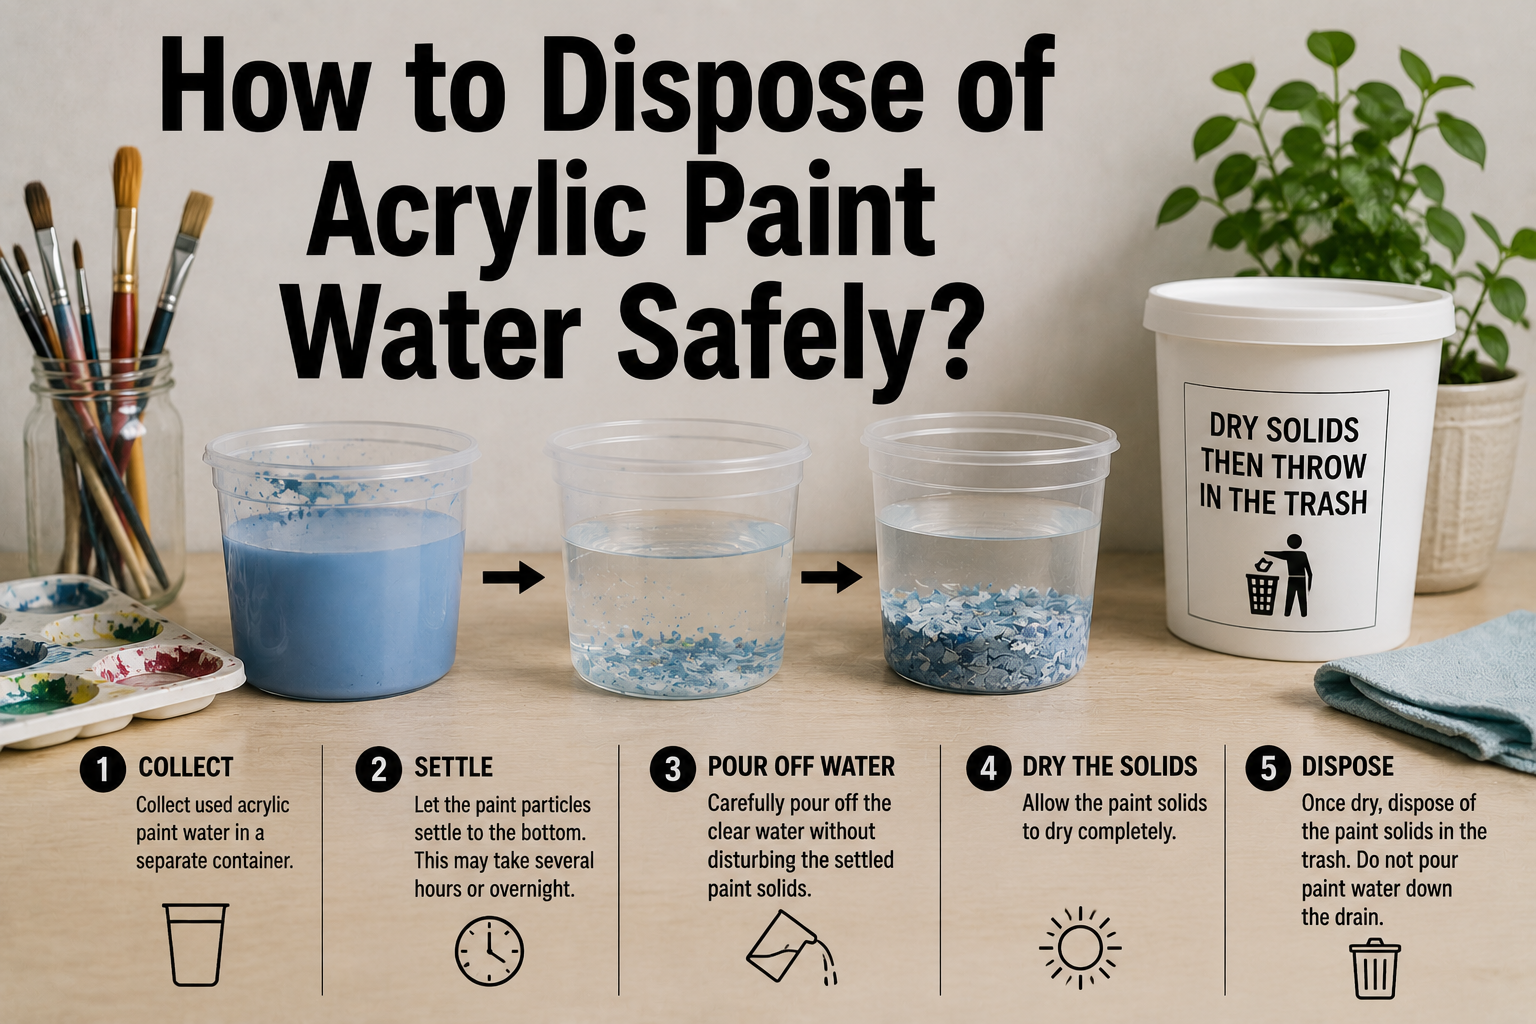
Method 1: The Settle-and-Evaporate Method (Best for Most Home Artists)
This is the most accessible option for anyone painting at home, and it costs nothing beyond a container you already own.
- Pour your used paint water into an open plastic tub, bucket, or wide-mouthed jar. A shallow container speeds up evaporation.
- Place it somewhere ventilated and out of reach of pets and children — a garage, shed, or covered porch works well.
- Let it sit undisturbed for several days to a couple of weeks, depending on humidity and the depth of the water. You’ll notice the pigment and solids settling to the bottom while the water evaporates.
- Once the water has fully evaporated, you’ll be left with a layer of dried acrylic residue. Peel or scrape it out and throw it in your regular household trash.
- Rinse the container and reuse it for the next batch.
This method produces zero wastewater and is ideal if you paint a few times a week rather than running a full studio.
Method 2: Drain Screen and Dilution
If you only generate small amounts of lightly tinted water, a fine mesh drain screen (sold at most dollar and hardware stores) can catch visible paint solids before they enter the pipe. Adding extra clean water to dilute the remaining tint before it goes down the drain reduces concentration, though it doesn’t remove the microplastics — it just spreads them out. This is the least protective method on this list and is best reserved for very light, occasional rinses of non-toxic, AP-labeled paints.
Method 3: Coffee Filter Straining
Pour your paint water through a standard coffee filter (or the larger commercial filters used in coffee urns) set over a separate container. The filter captures solid pigment particles, which you then let dry and toss in the trash. This is inexpensive and works well for smaller volumes, though it’s slower than a drain screen and won’t catch the finest microplastic particles either.
Method 4: Clumping Cat Litter Absorption
Line the bottom of a 5-gallon bucket with 6–8 inches of clumping (bentonite) cat litter. Pour your paint water directly onto the litter and let it absorb and clump. Once clumped, scoop out the solids and dispose of them in the trash. This method keeps 100% of the water out of your drain and is a favorite among artists who already keep litter on hand, though it does mean storing and eventually trashing a fairly heavy, bulky byproduct.
Method 5: Commercial Filtration Kits
Purpose-built kits — the most well-known being the Golden CRASH Paint Solids Water Cleaning System — combine a coagulant, a pH-neutralizing solution, and a filtration setup to treat paint water so it can be safely returned to the drain. A typical kit processes around 16 gallons of water per box and runs roughly $40–$60, with refills available separately.
The process usually takes 24–48 hours from start to finish (mixing, settling, filtering, and letting the solids dry to a “cracked mud” texture) and can produce a noticeable sulfur-like odor during the neutralizing step, so plan to run it in a ventilated space like a garage. This is the most thorough at-home option if you want your rinse water to genuinely be lab-safe for the drain, but it’s also the most expensive and time-intensive for casual painters.
Method 6: DIY Sand-and-Gravel Filter Pit
For artists with outdoor space (and local regulations that permit it), digging a small filtration pit lets nature do the filtering. Dig a pit roughly 18–24 inches deep, add 6–10 inches of sand at the bottom, and top it with 10–12 inches of coarse gravel. Pour paint water directly onto the gravel; it filters down through the layers before slowly dispersing into the soil below.
This method requires real labor to set up and isn’t appropriate in every jurisdiction or soil type, so check local environmental regulations before building one — and never use it if you work with pigments that carry a hazardous warning label.
Quick comparison
| Method | Cost | Effort | Best For |
|---|---|---|---|
| Settle & Evaporate | Free | Low | Home painters, occasional use |
| Drain Screen + Dilution | Under $5 | Very low | Light, infrequent rinsing only |
| Coffee Filter | Under $10 | Low | Small batches |
| Cat Litter Absorption | ~$10–$15 | Low | Home painters who already own litter |
| Commercial Filtration Kit | $40–$60 | Moderate | Frequent painters wanting drain-safe water |
| Sand & Gravel Pit | $20–$40 (one-time) | High | Outdoor studios with yard space |
Reducing Paint Water Waste in the First Place
The easiest way to deal with paint water is to generate less of it:
- Wipe before you rinse. Drag your brush across a rag or paper towel to remove most of the pigment before it ever touches water.
- Use two smaller jars instead of one large one. A “dirty” jar for the first rinse and a “clean” jar for a final rinse means you use less water overall and can go longer between water changes.
- Only load what you need onto your palette. Excess paint that dries unused is waste before it even reaches your brush.
- Cover your palette between sessions with plastic wrap or an airtight container to keep unused paint workable longer, rather than washing it away.
Special Cases: Studios and Classrooms
If you’re managing paint water disposal for a classroom, workshop, or busy shared studio, the small-batch methods above won’t scale well. A plumbing solids separator — installed inline on a sink’s drain — automatically filters paint solids from every rinse that goes down that sink, making it a practical set-and-forget solution for high-traffic spaces, though it requires professional installation and is the most expensive option covered here.
For occasional large cleanouts (e.g., end-of-semester palette cleaning), it’s often easier to use the evaporation method in bulk containers and schedule a single trip to a local household hazardous waste facility for anything containing warning-labeled pigments.
Frequently Asked Questions
Can I pour acrylic paint water down the drain if it’s diluted enough? Diluting reduces the visible tint but doesn’t remove the microplastic particles — they simply travel down the drain in a more diluted form. For genuinely drain-safe water, use a commercial filtration kit or one of the solids-removal methods above rather than relying on dilution alone.
Is acrylic paint water safe for plants or soil? Non-toxic, AP-labeled acrylic paint water isn’t acutely poisonous to most plants in small amounts, but it isn’t good for soil health either — the plastic binder doesn’t biodegrade and can accumulate in soil over time. Avoid pouring paint water directly onto garden beds or lawns.
How long does it take for paint water to evaporate? In a shallow, open container with decent airflow, expect anywhere from a few days to two weeks, depending on humidity, temperature, and how much water you’re evaporating.
Can I flush acrylic paint water down the toilet instead of the sink? No. Flushing sends the same microplastics and paint solids into the wastewater system, and it carries the added risk of clogging toilet pipes, which tend to have narrower bends than sink drains.
Is acrylic paint water safe for septic systems? It’s riskier for septic systems than municipal sewage, since acrylic residue can disrupt the bacterial digestion a septic tank relies on. If your home is on septic, prioritize the evaporation, filtration, or cat litter methods over anything that sends water down the drain.
Does adding vinegar or baking soda neutralize paint water? Not meaningfully. Vinegar and baking soda can shift pH slightly, but neither one removes the suspended plastic particles that make acrylic paint water a problem in the first place. Commercial kits use purpose-built coagulants for that reason.
Final Thoughts
Disposing of acrylic paint water responsibly doesn’t have to be complicated or expensive — it just requires swapping the instinct to rinse-and-drain for a method that actually separates the plastic and pigment from the water first. Whether you go with a free evaporation setup, a cat litter bucket, or a commercial filtration kit, the goal is the same: keep microplastics out of the water system and paint solids out of your pipes.
Start with the method that best fits how often you paint, and if you work with cadmium, cobalt, or other warning-labeled pigments, take the extra step of finding your nearest household hazardous waste facility. Your drains, your local waterways, and the wildlife downstream will thank you — so pick a method from this guide and put it to work the next time you rinse a brush.
Related Articles
Does Paint Expire? Complete Guide to Shelf Life, Signs & Storage Tips
How Long Does Oil Paint Take to Dry? Complete Drying Time Guide
Can You Thin Acrylic Paint With Water? The Complete Guide
Is Acrylic Paint Washable? Complete Guide to Removing It From Any Surface